Home / Whipping Knots / Common Whipping
Common Whipping
The basic of whipping techniques, the common whipping, prevents a rope from fraying, that is, unraveling into thinner fibers. It can also be used for securing objects together. It can be tied with twine or paracord. This technique is mentioned in The Ashley Book of Knots. It is also known as plain whipping, wolf whipping and ordinary whipping. It can be tied without using a needle or any tool.
How to Tie a Whipping Knot
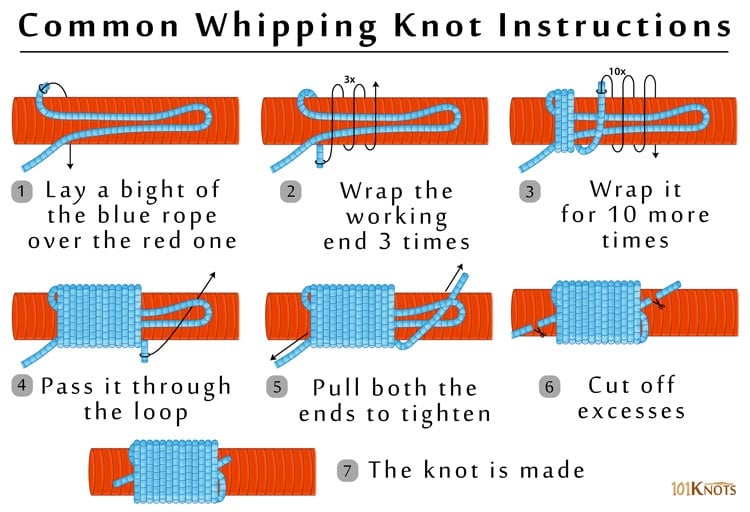
The thick red rope should be whipped at a short distance (about one and a half times its diameter) from its end.
Tips
- You can make as many turns to cover a length of the red rope that is about one and a half to two and a half times the rope diameter.
- The wraps should be made tightly keeping them close to each other.
- For maximum friction to hold the knot in its place, you should use natural twine on a natural fiber rope.
- Synthetic ropes can be melted by heat after cutting in step 6.
- While pulling on the standing end in step 5, take care to take the working end and bight only halfway underneath the whipping. If you pull it fully through by mistake, the knot comes undone.
Variation
- Hangman’s noose – It is a sliding loop knot that uses two bights of rope instead of one.
| Advantages | Disadvantages |
| Easy and quick to tie | Tends to slip off the rope easily |
| Gives a neat appearance to the ends of a rope | If any one of the turns get cut accidentally, the whipping unravels rapidly |
Uses
- In whip making. The knot is used to attach parts of a whip together.
- To join two ropes.
- To make a loop at the end of a rope.
- To make sliding knot paracord bracelets.
- Decorative purposes.
How to Tie Video
How to Tie a Common Whipping Knot Step by Step
- Lay a bight of the blue rope over the red one
- Wrap the working end 3 times
- Wrap it 10 more times
- Pass it through the loop
- Pull both ends to tighten
- Cut of excesses
- The knot is made


